 Getting
StartedSetup Device InformationGraphical User
Interface Design (GUI)Alert
MechanismEvent
Handling DesignDistributed
Network ArchitectureGlossaryJava
Developer
Guide Getting
StartedSetup Device InformationGraphical User
Interface Design (GUI)Alert
MechanismEvent
Handling DesignDistributed
Network ArchitectureGlossaryJava
Developer
Guide |
.Getting
Started Download Downloadcr-Instrument can be downloaded from http://www.cloud-rain.com How
to startup cr-Instrument:
login1. The default password for 'Admin' is 'admin'. 2. The default password for 'User' is '123'. |
.Setup Device Information
| Station and Device Data 1. The information obtained by "station" is called "device data". There are four sources of device data, that is, there are four types of stations: (1) Serial port : The range is COM1 ~ COM255, for example COM2, each serial port is treated as one station. (2) Socket port : For example, 6601, each socket port is treated as a station. (3) TCP client : is the client side of the Socket server, the name format is "tcpclient@ip:port", for example tcpclient@192.168.45.73:12568, each TCP client is regarded as one station. (4) Read file line by line : Read the file line by line is also regarded as a station, so this type of data is also considered as "device data". Config device table1. The key data for a row is: station name+ device name + model name + Serial Number + Data Name, i.e.: each row is for a data name. (Not a row for a device, if a device affords two data values, for example, temperature and humidity, then this device will be displayed in two rows) 2. Unless necessary, leave the master-id , device-id and dummy-id blank. |
.Graphical User Interface
Design1. The following is a
description of the GUI settings screen and buttons: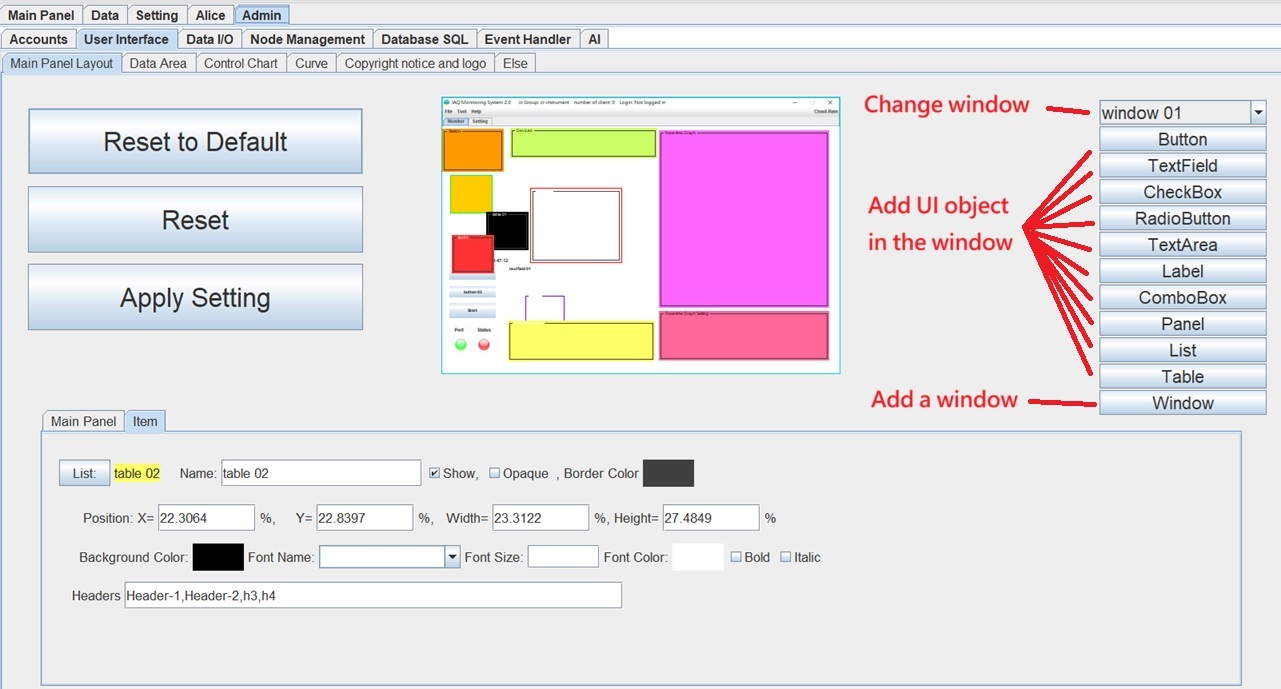 2. When adjusting objects using the keyboard: (1) Move: Up/Down/Left/Right arrow keys. (2) Quick move: CTRL + Up/Down/Left/Right arrow keys. (3) Resize: Shift + Up/Down/Left/Right arrow keys. 3.On the frame panel design, the symbol '%' indicates the percentage relative to the screen size. On other items design, the symbol '%' represents the percentage relative to the frame size. 4."Start button" and "Stop button" are the same button, but the status is different. After pressing the "Start button", the realtime monitor status is set to "true". And, after pressing the "Stop button", the realtime monitor status is set to "false". |
.Alert
Mechanism| E-mail alert 1.To send email, you must first apply an gmail as sender. (no limitation for receiver) 2.The sending email computer must be setup before sending email , set it to 'low security'. For more detail, please google "gmail low security application". 3.If still having problem, using "Sign in with the app password" option, in this way, google email system will produce an app password for sending email. (It is 16 byte length, and used only for app. This password can not be used to login gmail account.) SMS (Short Message Service) alert1.To send message to phone, you must first apply an sms account from SMS service provider. 2.The SMS service provider must afford the web function for sending message, for example: http://202.49.148.216/kotsmsapi-1.php?username=john&password=pw1234&dstaddr=0911876353&smbody=You_are_wonderful 3.In the setup panel, you must setup the web function, for example: http://202.49.148.216/kotsmsapi-1.php?username=[#account#]&password=[#password#]&dstaddr=[#sendToPhone#]&smbody=[#message#]
Sound alert1.Accepted sound file formats are *.mp3, *.wav and * .au. 2.When playing sound, you can stop playing by press the 'ESC' key. |
.Event
Handling DesignThe steps to add a new
event handling, as shown below :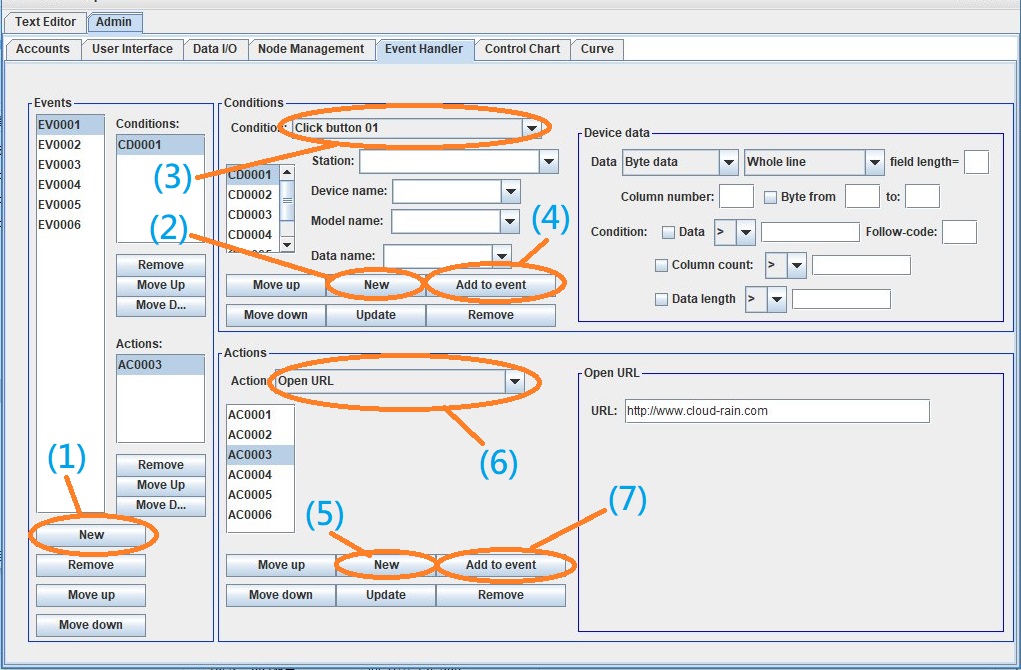 The steps are explained as follows: (1) Add an event, and an event code will be added to the event list, such as EV006. (2) Add a new condition, and a condition code will be added to the condition list, such as CD005. (3) Select the condition item, if there are parameters for the condition, then enter the required parameter values for the condition. (4) Add this condition to the event as a condition to trigger the event. (5) Add an action (that is, the action to be taken when the above conditions are met), and an action code, such as AC007, will be added to the action list. (6) Select the action item, if there are parameters for the action, then enter the parameter values required for the action. (7) Add this action to the event as the action to be taken when the event is triggered. Conditions:
(There are two kinds of conditions: triggered event condition and
non-triggered event condition)Triggered event condition, examples: After connected After disconnected After system startup AI processing result data Any data Before system terminated Checkbox 01 action Window 02.heckbox 01 action Click button 01 Click button 02 Click window 02.button 02 Click connect button Click start button Click stop button Click file menuitem 01 Click help menuitem 01 Click tool menuitem 01 Combobox 01action Window 02.combobox 01action Data checked by Java class Database data Device data File data (binary) File data (text) List 01 action Window 02.list 01 action Message 01 confirmed YES Message 01 confirmed NO Object data Over upper alert level Over upper take-action level Radiobutton 01 action Window 02.radiobutton 01 action Schedule time Textfield 01 action Window 02.textfield 01 action Under lower alert level Under lower take-action level Non-triggered event conditions: (These conditions can not work alone, because they can not be triggered.) and in continuous monitoring mode and checkbox 01 checked and checkbox 01 not checked and radiobutton 01 selected and radiobutton 01 not selected and window 02.checkbox 01 checked and window 02.checkbox 01 not checked and window 02.radiobutton 01 selected and window 02.radiobutton 01 not selected Actions: (If the previous
setup conditions
satified, action will be performed.)Action sound alarm Alert sound alarm AI learning AI processing AI add processing result to learning data AI add data to learning data All station send command Append data to textarea 01 Append data to window 02.textarea 01 Combobox 01 add item Combobox 01 set items Combobox 01 remove item Combobox 01 remove all items Window 02.combobox 01 add item Window 02.combobox 01 set items Window 02.combobox 01 remove item Window 02.combobox 01 remove all items Connect all port Database query Database update Disable button 01 Disable window 02.button 01 Disconnect all port Enable button 01 Enable window 02.button 01 Exit application First device send command First station send command FTP delete FTP download FTP upload Java class (see Java developer guide for more detail) Java class of dce node (see Java dce developer guide for more detail) List 01 add item List 01 set items List 01 remove item List 01 remove all items Window 02.list 01 add item Window 02.list 01 set items Window 02.list 01 remove item Window 02.list 01 remove all items Log Next device send command Next station send command Open URL Operating system command Pause Play sound Read file line by line Read binary file Read text file Restart application Run apache ant Run apache maven Save to file Set A=B Set A=Euler's number Set A=pi Set A=random() Set A=log(B) Set A=log10(B) Set A=B! Set A=sin(B) Set A=cos(B) Set A=tan(B) Set A=cot(B) Set A=sec(B) Set A=csc(B) Set A=exp(B) Set A=abs(B) Set A=cbrt(B) Set A=random(B,C) Set A=round(B) Set A=signum(B) Set A=sqrt(B) Set A=toradians((B) Set A=todegrees(B) Set A=B+C Set A=B-C Set A=B*C Set A=B/C Set A=(the logarithm base B) C Set A=ave(B,C) Set A=mod(B,C) Set A=max(B,C) Set A=min(B,C) Set A=pow(B,C) Set A=(B=C) Set A=(B>C) Set A=(B<C) Set A=(B>=C) Set A=(B<=C) Set A=f(x) (see Mathmatical expression in cr-Instrument for more deatil.) Set A=f(x,y) (see Mathmatical expression in cr-Instrument for more deatil.) Set action data Set data value Set device SN Set device value Send command Send email message Send SMS message to mobile phone Set label 01 value Set winsow 02.label 01 value Set text value Set textarea 01 value Set wondow 02.textarea 01 value Set textfield 01 value Set wondow 02.textfield 01 value Set textlabel 01 value Set window 02.textlabel 01 value Set variable value Show message dialog Show confirm message dialog Start monitor Stop continue send command Stop monitor Stop reading file Table 01 add row data Window 02.able 01 add row data Update event setting from file Parameter for
transformation (mainly used in
1.set text field 2.set text label
3.db sql script 4.send sms msg 5.send email (subject and msg) 6.log as
action 7.show option pane as action 8.java class as action
(used this for parameter) 9.OS command 10.save to file as action
11.send command as action等)[#20#] = " " (=space) [#space#] = " " [#2c#] = "," [#rn#] = "\r\n" [#0d0a#] = "\r\n" [#n#] = "\n" [#r#] = "\r" [#0d#] = "\r" [#0a#] = "\n" [#id#] = my ID [#ip#] = my IP [#cr_engine_version#] = cr_engine version [#cr_wsn_version#] = cr_wsn version [#computername#] = computer name [#computeros#] = computer OS [#computerarch#] = computer architecture [#groupname#] = group name [#nickname#] = my nick name [#jvmversion#] = jvm version [#jvmarch#] = jvm architecture [#ap_version#] = application version [#country#] = country [#language#] = language [#starttime#] = system start time, in "yyyy-MM-dd HH:mm:ss" format [#datavalue#] = data value [#textvalue#] = text value [#originaltime#] = data time in ms [#originaldata#] = original data value [#date#] = date, in "yyyy-MM-dd" format [#datetime#] = date and time, in "yyyy-MM-dd HH:mm:ss" format [#time#] = time, in "HH:mm:ss" format [#ci_version#] = cr-instrument.version [#title#] = title with version [#$variable_name#] = value of a variable, ex:[#$testvalue#] [#textfield01#] = textfield01 value [#window 02.textfield 04#] = window02.textfield04 value [#textarea01#] = textarea01 value [#window 02.textarea 04#] = window02.textarea4 value [#label01#] = label01 text value [#window 02.label03#] = window02.label03 selected value [#combobox01#] = combobox01 selected value [#window 02.combobox03#] = window02.combobox03 selected value [#list01#] = list01 selected value [#window 02.list03#] = window02.list03 selected value [#table01.col01.row02#] = table01.col01.row02 value [#window 02.table01.col01.row03#] = window 02.table01.col01.row03 value [#table01.row02#] = table01.row02 value, in csv format [#window 02.table01.row03#] = window 02.table01.row03 value, in csv format
Button 01 is the button on
the up right
corner of the monitor screen, as following: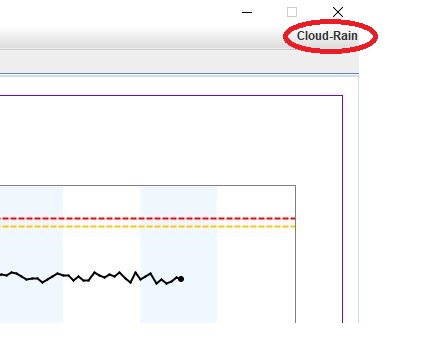 |
.Distributed
Network Architecture| Distributed
network
architecture is necessary when remote monitoring is required, or when
multiple devices need to be monitored simultaneously. Point-to-point connection 1.Point-to-point connection by IP to IP connection, as shown below. 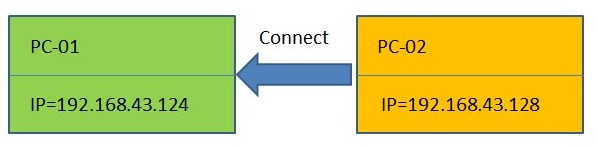 Connection setting screen Connection setting screen1.The settings of the connection will appear after the program is started. 2.Check "Connect to IP" and enter the IP value of the other party to connect, as shown below. 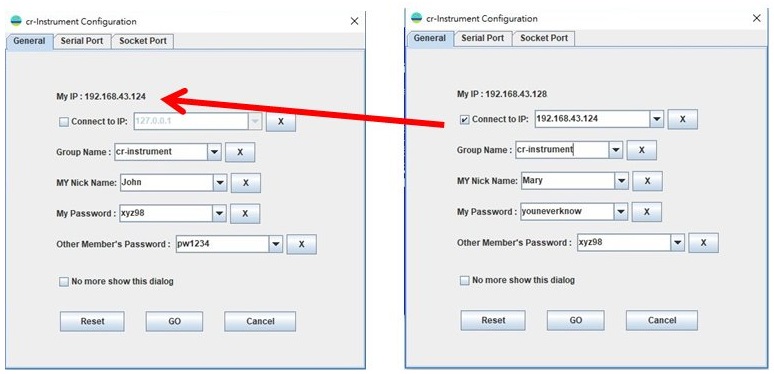 Security Mechanism Security Mechanism1.Between each node, you must obtain the authorization of the other party to perform various control actions (such as opening and closing the socket port and serial port). 2.The security mechanism between each node is as shown in the following figure:When the command code passed by the other party meets my commandpw, it can get my authorization.  The password setting screen is as follows: 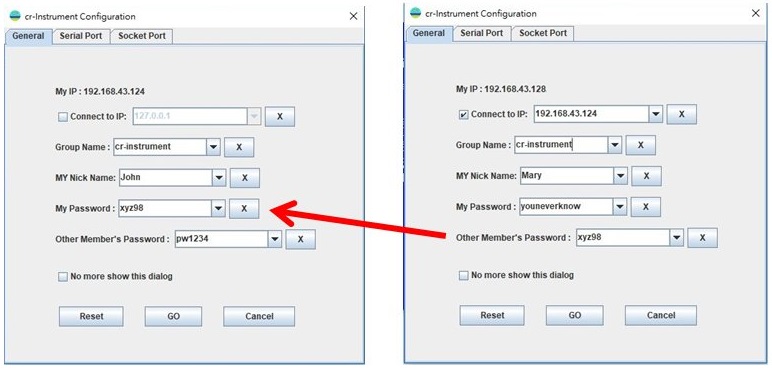 Multi-point connection Multi-point connection1.When connecting multiple points, one principle must be observed: Only one of the nodes is the root node. The green nodes in the following illustrations are the root nodes. 2.There is no limit to the number of connection points, but when there are too many points and a large amount of data is transferred, the transmission rate may be affected. The following is an example of a multipoint connection. 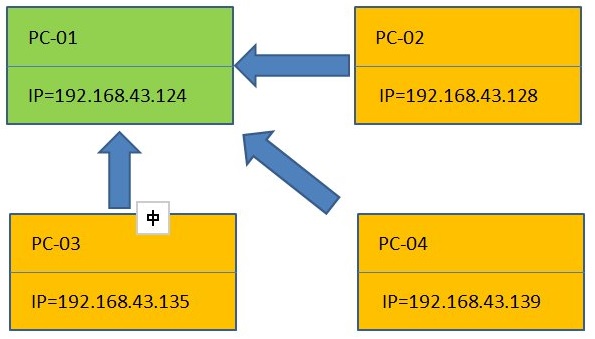 The following is an example 2 of a multipoint connection. 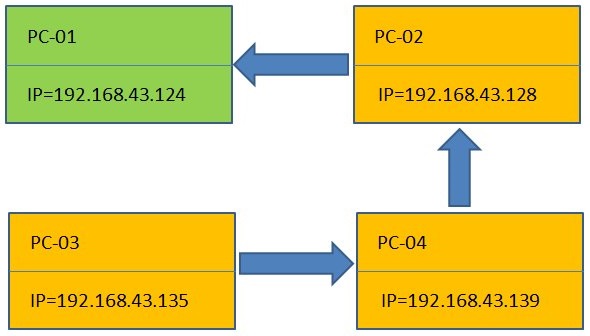 The following is an example 3 of a multipoint connection. 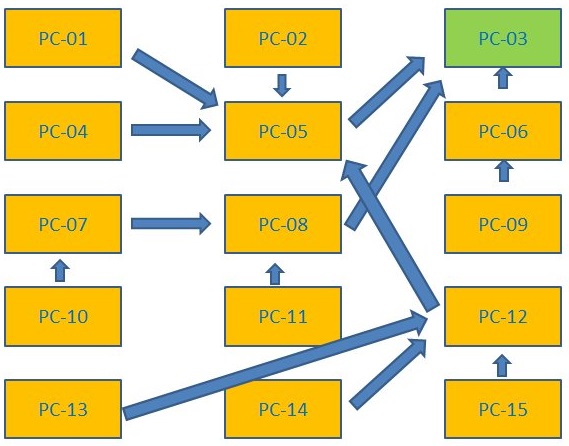 |
.Glossary| Byte data, String data, and
Byte String data in Event handling setup: When receive byte data from a device, for example, if the byte values are {0x31,0x32,0x33}, then the string data is the string "123" (ASCII values as characters), and the byte string data is "313233". (hex value as string, and no space between each character ) |